

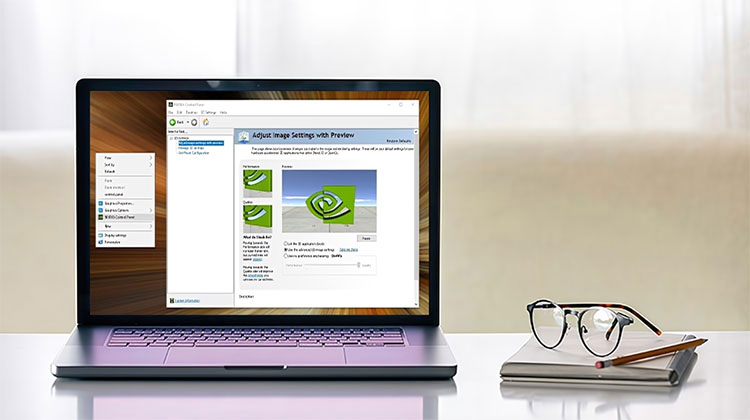
If you’re experiencing issues with the NVIDIA Control Panel not opening in Windows 11, you’re in trouble, since you can not modify NVIDIA settings without accessing the Control Panel. Although the issue might not be frequent, if it occurs, it can put the user in a bind since there’s no way to access NVIDIA settings without opening the control panel.
There are a variety of options to solve the issue with your Windows computer. After you’ve applied one or all of the fixes listed above, you’ll access the NVIDIA Control Panel on your system. Let’s take a look at the fixes and how to apply these fixes to your system:
Why Is NVIDIA Control Panel Not Opening?
Before applying fixes, it’s important to understand what might be causing the issue:
- Outdated or corrupted NVIDIA drivers
- Missing NVIDIA Control Panel app (common with Microsoft Store installs)
- Disabled NVIDIA services
- Conflicts after a Windows update
- GPU not being detected properly
- Corrupted system or registry files
How to Fix NVIDIA Control Panel Not Opening
1. Run NVIDIA Control Panel as Administrator
Most people prefer to launch the NVIDIA Control Panel via Windows 11’s context menu. But, you can choose to run the application as an administrator using these steps:
Steps:
- Right-click the Start button and select Search
- Type NVIDIA Control Panel
- Right-click it and choose Run as administrator
💡 Note: Since it’s a UWP app, accessing the .exe file directly may require permission to the WindowsApps folder.
Also read: System Thread Exception Not Handled Error on Windows: 7 Easy Solutions
2. End NVIDIA Background Processes
Sometimes you cannot see the NVIDIA Control Panel when multiple instances of it are running. Ending NVIDIA background processes will allow restarting the application. This is the method to end the background NVIDIA process:
Steps:
- Press Ctrl + Shift + Esc to open Task Manager
- Go to the Processes tab
- Find and select all NVIDIA processes
- Click End Task
- Restart Windows Explorer
- Try opening the Control Panel again
3. Restart NVIDIA Services
One common reason for the NVIDIA Control Panel not opening is a disabled NVIDIA Display Container service. Other NVIDIA services must be enabled for the application to function properly. Therefore, it is important to ensure whether this service and others are working as expected:
Steps:
- Open Search and type Services
- Locate NVIDIA Display Container LS
- Double-click it and set:
- Startup type → Automatic
- Click Start (if stopped)
- Apply changes and click OK
Repeat the same for:
- NVIDIA LocalSystem Container
- NVIDIA NetworkService Container
4. Repair or Reset NVIDIA Control Panel
The Windows 11 standard repair and Reset apps are now available in the NVIDIA Control Panel. Therefore, these troubleshooting tools may help you solve the problem of the app not launching. You can choose the Reset and Repair options. reset or repair options from the same spot in the NVIDIA Control Panel settings.
5. Update NVIDIA Graphics Drivers
Updating the NVIDIA graphics driver in your computer will also update your control panel application to support it. It’s a feasible option to try in case the driver for your graphics card is outdated.
Steps:
- Open Device Manager
- Expand Display Adapters
- Right-click your NVIDIA GPU
- Select Update Driver
Alternatively, you can download the latest drivers directly from the NVIDIA website.
6. Install Microsoft Visual C++ Redistributables
The other possibility is that the NVIDIA Control Panel won’t open because your PC is missing the required Visual C++ Redistributable program to run it. It is possible to eliminate this issue by reinstalling the Visual C++ packages on your computer if required. This is the procedure to install a damaged Visual C++ Redistributable on Windows:
- Visit the Microsoft Visual C++ download page
- Download the latest supported versions (x64)
- Run the installer and complete setup
7. Edit the Windows Registry
It is a Windows Registry tweak that creates a new context menu for opening the NVIDIA Control Panel. Because this option requires deleting a key, it is recommended that you understand how to back up to the Windows Registry before proceeding.
Steps:
- Open Registry Editor using the Win + R keyboard shortcut, then type regedit in the Run dialog box, and press “OK.”
- Enter this location into the registry address bar, then click Return :
Computer\HKEY_LOCAL_MACHINE\SOFTWARE\Classes\Directory\background\shellex\ContextMenuHandlers - Right-click the NvCplDesktopContext subkey and select delete.
- Choose “Yes” to delete your NvCplDesktopContext key.
- Remove the current path within the registry bar and then enter this new location :
Computer\HKEY_CLASSES_ROOT\Directory\Background\shell - Then, step, right-click Shell, then select “New”.
- Use the on the key to add a new subkey in the Shell.
- Type Nvidia Control Panel as the name of the new key.
- Right-click the Nvidia Control Panel subkey and choose its “New” and Key context menu option.
- Enter the command double-click its (Default) string.
- Select the option and double-click the (Default) string.
- Then, enter the path you want to follow in the Value data box:
C:\Windows\System32\nvcplui.exe - Click the OK button and save the string’s value.
- Select to restart your Windows computer.
Also read: Getting Windows Ready Stuck? 6 Easy Fixes to Get Your PC Again
8. Reinstall the NVIDIA Control Panel
It is the NVIDIA Control Panel, a UWP application that you can uninstall or download and reinstall. If none of the solutions listed in this guide help you, then the application may be missing or corrupted files. To remedy this, you must remove the NVIDIA Control Panel from Settings and uninstall the app.
Once you’ve uninstalled the NVIDIA Control Panel, restart your computer. After that, click the “Get in” Store application on the NVIDIA Control Panel Microsoft Store page. Select Open Microsoft Store, and select to reinstall the app.
Tips to Avoid This Issue
- Keep your GPU drivers updated regularly
- Avoid force shutdowns during updates
- Install drivers only from official sources
- Don’t run multiple GPU optimization tools simultaneously
Final Thoughts
These solutions could solve the issue of the NVIDIA Control Panel not opening in Windows. There are a variety of possible causes for the NVIDIA Control Panel not opening. These solutions may not fix the issue in every situation. If you require additional assistance to resolve the app not working, you can create a help ticket through the NVIDIA Support page.
FAQs – NVIDIA Control Panel Not Opening
What is the main reason behind NVIDIA Control Panel Not Opening?
The most common reason for NVIDIA Control Panel Not Opening is outdated drivers or disabled NVIDIA background services.
Can I open NVIDIA Control Panel manually?
Yes, you can run the nvcplui.exe file from the system directory or search for it in Windows and launch it as administrator.
Why does NVIDIA Control Panel Not Opening after updating Windows?
Sometimes Windows updates create compatibility issues, which can prevent NVIDIA Control Panel Not Opening properly or cause it to crash.
Can outdated drivers cause NVIDIA Control Panel Not Opening?
Yes, outdated or corrupted drivers are one of the main reasons NVIDIA Control Panel fails to open or respond in Windows 11.
How do I check if NVIDIA services are causing NVIDIA Control Panel Not Opening?
You can open Services and verify if NVIDIA Display Container LS is running properly to troubleshoot NVIDIA Control Panel Not Opening.


Leave a comment