

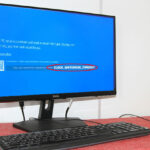


Many users have reported that Windows 10 won’t boot properly following the update. The system starts to load; however, Windows 10 gets stuck ” preparing automatic repair” or the Diagnosing phase for a long time, and then says that the startup can not be fixed. Sometimes you might experience power issues, or after a shutdown, Windows 10 gets stuck on preparing automatic repair. This is usually due to corrupted or lacking system files, the corrupted Windows boot manager, or a driver that isn’t compatible with the latest Windows 10 Version.
What Causes “Preparing Automatic Repair” in Windows?
The “Preparing Automatic Repair” issue is most often encountered in Windows 10 and 11. This issue occurs shortly after or during a Windows update. Here are common reasons:
- Corrupted or missing system files
- Failed Windows updates
- Damaged Boot Configuration Data (BCD)
- Hard drive errors or bad sectors
- Malware or virus infections
- Sudden power outages or improper shutdowns
Before You Begin
Disconnect all devices from your computer, USB drives, printers, and external hard disks, and then check whether you can see the computer screen.
Because of this issue, Windows fails to start normally, and we require a Windows 10 installation media to proceed with the following steps.
Windows Stuck on Preparing Automatic Repair? Try These Fixes
1: Repair MBR and Rebuild BCD
To repair the Master Boot Record (MBR) and rebuild the Boot Configuration Data (BCD), you’ll need a Windows installation USB or DVD.
- Install the Windows installation media on your computer, then restart it.
- Input the BIOS (or UEFI) settings when it begins to boot up.
- In the boot menu, select your boot disc/CD as the first boot disk (Removable Disk)
- Click F10 and save changes, then Restart Windows.
- During reboot, you can press any key to boot from a DVD or a CD.
- If you are presented with that Install Windows screen, click the link ” Repair Your Computer” on the bottom left
- In the screen that says Select an option, select Troubleshoot item.
The next screen will appear. Select “Advanced Options”.
Within the Advanced Options screen, pick the option that is named ” Command Prompt”.
From the advanced command prompt, type the following commands, then press Enter to run them:
- bootrec.exe /rebuildbcd
- bootrec.exe /fixmbr
- bootrec.exe /fixboot
After these commands, you will need to execute additional Chkdsk commands too. For these commands, you must know that drive letters are for partitions on your hard drive.
- chkdsk /r c:
- chkdsk /r d:
This is just an illustration, but keep in mind that you will need to execute chkdsk for the hard drive issue you own. After a complete scan, restart your computer, and then check whether the preparing automatic repair issue has been resolved.
Also read: System Thread Exception Not Handled Error on Windows: 7 Easy Solutions
2: Boot Windows into Safe Mode
If your computer is unable to boot, try using safe mode and then performing a clean boot.
Begin (or begin booting) your computer using an installation disk. Insert the USB flash drive or DVD and then restart your computer. You can then gain access to more advanced options.
Select Startup Settings, click Restart, and select Safe Mode with Networking or Low Resolution.
3: Uninstall or Update Display Drivers
Then, Windows begins in safe mode, with minimal system requirements. I suggest you update the display driver using Device Manager. This should fix the issue for you.
- Click Windows Key + R, enter devmgmt.msc, and ok.
- Expand Display Adapter.
- Right-click the driver and select Update Driver Software.
It is important to use a Wired Internet connection to upgrade drivers while in Safe Mode. Try selecting the low resolution if there is no wired connection on your system. Try updating all drivers for your device, if possible.
4: Run DISM and SFC Commands
Missing, corrupted, or damaged system files can be the main reason Windows 10 preparing automatic repair. Run the build in DISM and SFC commands scan and restore missing system files from a compressed folder located in %WinDir%\System32\dllcache.
- Typing cmd into the menu search,
- Right-click the command prompt and choose Run as Administrator.
- Perform the DISM (Deployment Image Service and Management )command below.
DISM /Online /Cleanup-Image /RestoreHealth
- It may take around 15 to 20 minutes to be completed, so be patient. Don’t interrupt it.
- After you’ve completed the scanning process, type SFC /scannow and click OK.
- You must wait until you have completed 100% of the scan.
Restart your Windows and verify this time when the system is running normally.
5: Disable Automatic Startup Repair
After implementing the Above method still getting the same problem. Then, disabling Automatic Repair can help to fix it. You can do this in the same way by performing a command. To accomplish this, go to the Advanced Command Prompt and type the following command.
BCDedit /set GUID recoveryenabled No
After typing this, press Enter to run the command and restart Windows. Problem solved. Still experiencing the same issue, go to the next troubleshooting process.
6: Restore the Windows Registry
Sometimes, due to a different installation process or uninstallation, the Windows registry may be corrupted, and a variety of issues may occur when Windows starts up, stuck on”Repair screen” or”Windows 10 automatic repair couldn’t repair your pc”. Fix this issue by restoring the Registry using the RegBack directory. To do this, follow these steps.
First, access the Command Prompt using advanced boot options. In the Command Prompt, enter the following information and then enter to execute it.
copy c:\windows\system32\config\RegBack\* c:\windows\system32\config
If you’re asked to overwrite your files, type All” then press Enter. Now type “exit” and enter to exit the Command Prompt. Just restart your computer and verify if the issue has been solved.
7: Check Device Partition and OS Device Partition
Additionally, if the OS and device partition values aren’t correct, this could cause this issue. Start Command Prompt by selecting the Advanced Boot Options and typing in the following command. Press Enter:
Bcdedit
- Find the device partition and OS device partition values and verify that they’re set to the correct partition.
- On our device, the default and correct value is C:, but it can change for some reason to D: (or some other letter) and cause issues.
- When the values aren’t at C, follow the steps below, then hit Enter after each of them:
BCDEDIT / set {default} device partition=c:
bcdedit /set {default} osdevice partition=c:
The default is C:, but if you’re running Windows 10 is installed on another partition, make sure you select the partition’s letter instead of C. Reboot your computer and verify whether the issue is fixed.
Also read: 10 Best Windows Update Blocker Software for Windows 11
8: Reset or Refresh Windows 10
If, after completing all of the steps above, you still have problems, the final option to refresh (or reset) Windows is to reinstall Windows to get a fresh start. When you do this, all installed programs will be deleted, and your previously installed Universal applications and settings will be preserved if you select Refresh. In contrast, the Reset option will wipe all the installed settings, files, and applications. If you choose to go through with this route, it’s recommended to back up your data.
Additional Tips to Prevent Preparing Automatic Repair Loops
To avoid startup repair problems in the future:
- Keep Windows updated
- Avoid forced shutdowns
- Create restore points regularly
- Use reliable antivirus software
- Check SSD/HDD health periodically
- Keep device drivers updated
Conclusion
In conclusion, we’ve thoroughly discussed some solutions that could help you solve “Windows 10 preparing automatic repair error”. If you still can not boot Windows, this suggests that there are a variety of causes for the issue.
FAQs: Preparing Automatic Repair
Why is my computer stuck on Preparing Automatic Repair?
Your computer may get stuck on the “Preparing Automatic Repair” screen because of corrupted system files, damaged boot records, failed Windows updates, driver conflicts, or hard drive errors. In some cases, sudden power loss or improper shutdowns can also trigger the issue.
How long should Preparing Automatic Repair take?
Normally, the automatic repair process should take around 5 to 15 minutes. If your PC remains stuck for more than 30 minutes, it usually indicates a startup repair loop or system corruption problem.
Can I fix the Preparing Automatic Repair loop without reinstalling Windows?
Yes, in most cases you can fix the issue without reinstalling Windows. Methods like Startup Repair, Safe Mode, DISM, SFC scan, rebuilding the BCD, and System Restore often solve the problem successfully.
Will Resetting Windows Fix the Preparing Automatic Repair Loop?
Yes, resetting Windows can fix the repair loop if the issue is caused by corrupted system files or broken settings. You can choose the “Keep My Files” option to preserve personal data while reinstalling Windows.


Leave a comment