

For the iOS 15 feature, which is designed to be extremely easy to use, Hide My Email comes with a lot of features. What you can do but, as of now, cannot accomplish.
The brand-new Hide My Email feature in iOS 15 is not meant to replace Sign In with Apple, but it’s an obvious evolution of that concept. Instead of giving a company the email address you use, use a different work email address, and you can switch off when you need to.
Perhaps the company keeps spamming you and taking “unsubscribe” as a challenge. They’ve transferred the email addresses of your customers to other businesses, and now they’re sending you emails.
No matter the cause, if you’re trying to eliminate the issue, it’s only a few clicks. If you’ve previously used Hide My Email.
What Does “Hide My Email” Actually Mean?
Hiding your email is the act of covering your actual address using an unreliable or fake email address that forwards messages to your email. Instead of sharing your actual email with every app or website, you use a random or temporary email address like xdevid@relay.example.com that you can delete or disable at any time.
This technique hides your actual email from hackers, marketers, or data brokers, while still allowing you to receive genuine messages.
Also read: Email Thread Explained: How to Organize and Manage Them
How Apple’s Hide My Email Works
Apple users who have already signed up for iCloud and Apple One will have access to iCloud and premium features for free. If you don’t have access to any of these, you may buy iCloud+ plans that range from 50GB to 2 2TB.
After you’ve verified that your iCloud subscription is activated and you can access your Hide My Email option when you sign up for apps, enter your email on an online platform, or draft an email. If you do not see the Hide My Email option, choose Continue using Apple to access the identical security options.
Then, you can create and delete any unique email addresses you want. Apart from creating random email addresses to be used on a particular website or application, you can disable email forwarding on the Hide My Email address at any time.
How to Set Up Hide My Email
There’s no need to. Settings on iOS already has a section dedicated to Hide My Email that gives users the option to turn it on and off.
Utilize it in case of future use when looking to delete a fake email address and identify what that address actually represents (to log into something using it).
How to Use Hide My Email
Once you know how Hide My Email works, here’s how to access it and utilize the Hide My Email setting using your iPhone.
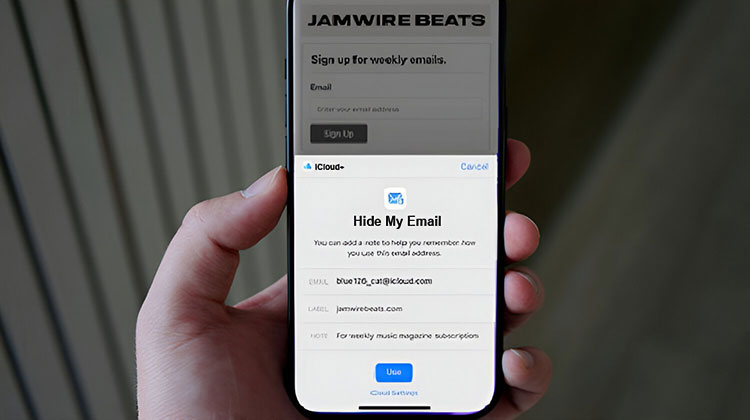
You can find Hide My Email within your Settings app. After launching your Settings app, you’ll need to click Your Apple ID profile, then scroll down to iCloud. Within the iCloud tab, you’ll have the option to select Hide My Email. To create new email addresses with Hide My Email, follow these steps:
- Go to Settings > [Your Name] > iCloud > Hide My Email.
- Tap Create New Address.
- Apple will generate a random alias. Add a label or note to track where it’s used.
It’s that simple! Now you can use this email you have received to set up accounts and subscribe to newsletters, sign up for coupons, and more, without getting the email spam to get into your main inbox.
Also read: Best Email Management Software 2025: Top 10 Picks for Businesses
How to Turn Off the Hide My Email fake address
It’s impossible to alter the fake address to the real one. If you’ve determined that a website is reliable and want to skip all of this Hide My Email stuff, it’s not possible.
Instead, you sign up at the site with your actual email address. To avoid receiving two emails from each, you should disable the fake account.
Within the details page for each Hide My Email you have set up, there is a button you can press to deactivate the email. Simply tap it, then “Deactivate” for confirmation that it has been disabled.
Ending Notes
It’s a lot more time-consuming to explain Hide My Email than it is to implement it. This is partly due to the bugs that have plagued it through the beta phase. However, it’s also because there are several choices.
There are only a few choices and a variety of ways to reach them.
In the real world, when you’ve installed iOS 15, when you log on to a brand new website, it will be possible to hide My Email with a single tap and without thought.
FAQs: Hide My Email
Can I delete a Hide My Email address?
Yes, you can disable or delete any alias anytime in iCloud settings.
Does Hide My Email work on Android or Windows devices?
No. Hide My Email is available only within the Apple ecosystem — on iPhone, iPad, and Mac — and requires an active Apple ID with iCloud+.
Can I reply to emails sent through Hide My Email?
Yes. When you reply, Apple automatically uses the alias — your real address stays hidden from the sender.
What is Apple’s Hide My Email feature?
Hide My Email is an Apple privacy feature that lets you create random email aliases that forward messages to your real inbox, keeping your personal address hidden.


Leave a comment