






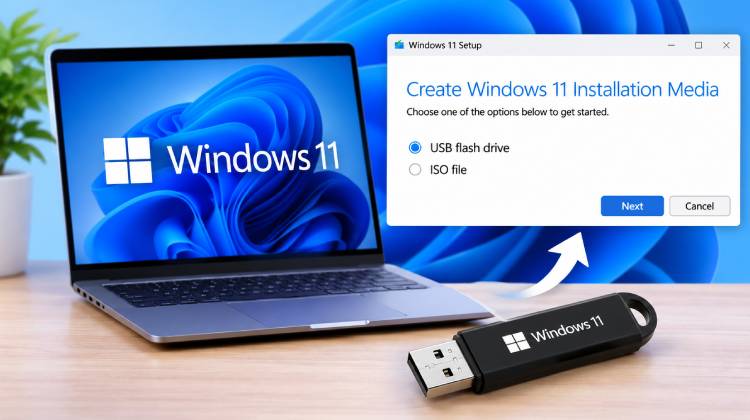
Creating a bootable Windows 11 USB drive is a useful tool when you’re setting up a new PC or reinstalling Windows. Microsoft’s official Windows 11 Media Creation Tool makes it easy by downloading the correct installation files and creating your USB drive for you.
But before you begin, it’s important to know what you’ll need to do, what to prepare, and how to fix common issues you may encounter. With a little preparation, you can avoid unnecessary interruptions and make the installation process smoother.
In this tutorial, we will go over all the steps to make a bootable USB drive with the Windows 11 Media Creation Tool. For those who want more flexibility, we’ll also cover other options such as Rufus and Ventoy.
What You Need Before Creating Windows 11 Installation Media
To download Windows 11 and prepare a Windows 11 installation USB drive, ensure that you have all the necessary items. These will help avoid issues during setup.
- 8GB flash drive: The Windows 11 Media Creation Tool will format the entire USB flash drive when creating the Windows installation file. Make sure to back up any important files before you do this.
- Stable internet connection: The Windows 11 installation files are quite large, and having a stable internet connection is crucial to ensure a smooth download process.
- A compatible 64-bit processor: The Windows 11 installation media is compatible with x64-based systems. Use the ARM64 version of the Windows 11 installation image if installing Windows 11 on an ARM-based device.
- Valid Windows 11 license (optional): No need to have a Windows 11 product key to download Windows 11 or create the Windows 11 Media Creation Tool. After installation, however, you’ll need an eligible license to activate Windows. You can also install Windows without entering a product key and then activate Windows later.
- A compatible computer that meets the Microsoft Windows 11 system requirements: The target computer must have at least 4GB of RAM, 64GB of storage, a DirectX 12-compatible GPU (Graphics Processing Unit), and should include TPM 2.0 and Secure Boot.
Also read: Easily Solve the Preparing Automatic Repair Loop on Windows 10
How to Use the Windows 11 Media Creation Tool
To use the Windows 11 Media Creation Tool, follow this step-by-step guide.
Download the Media Creation Tool.
Go to the official Windows 11 download page. You’ll find several options for installing or downloading Windows 11.
In this approach, find the Create Windows 11 Installation Media section and press Download Now. This will install a tiny “MediaCreationTool.exe” on your computer.
Make sure you’re downloading the utility directly from Microsoft’s website to avoid potentially modified or unsafe installation files.
Run the Tool as an Administrator
Once you have downloaded the executable file, open your Downloads folder, right-click on MediaCreationTool.exe, and choose Run as administrator.
The tool may request permission to make changes to your device. Select Yes to continue.
Once the application opens, read the Microsoft license terms and then click Accept.
Launch the utility as Administrator to ensure that it has the required permissions to prepare your USB drive and install the Windows files.
Select the USB Flash Drive.
The next screen allows you to choose your preferred language and Windows 11 edition.
The tool automatically uses the recommended settings depending on your current PC. If you use a different language or configuration, uncheck the recommended options and choose your preferences manually.
Click Next to continue.
On the “Choose Storage Media” screen, select a USB flash drive and click Next.
If you haven’t already connected your USB drive, then do so now. The tool will show the list of removable drives. Click on the right USB device in the list and proceed.
Note: Double-check before you move on the drive you selected. The Media Creation Tool will erase all data from the drive it is written to; thus, choosing an incorrect drive could mean data on that drive may be lost.
Wait for the Download and Creation Process
Once you’ve selected your USB drive, the Media Creation Tool will begin downloading the Windows 11 installation files.
Once it gets downloaded, it will automatically format the www drive and copy all the files to make it bootable.
It may take a few seconds or minutes depending on your internet speed, computer speed, and USB drive speed.
Don’t remove the USB flash drive or turn your computer on or off while the process is in progress. Allow the utility to go through each step without stopping.
Your Windows 11 Installation Drive Is Ready
When the process is complete, the Media Creation Tool will show a message saying that your USB flash drive is ready.
- Click Finish to close the application.
- You have now created a bootable Windows 11 USB drive! Plug it into the computer where you want to install Windows 11 and restart the system.
- Press the proper BOOT menu key during startup. This may be the F12, Esc, F9 key, or another key depending on the computer manufacturer.
Choose the USB Drive as the Boot Device. Your computer should then load the Windows installation environment, and you can then follow the on-screen instructions to finish installing Windows.
Fixing Common Windows 11 Media Creation Tool Issues
While Microsoft’s Media Creation Tool is pretty simple to use, you may encounter some issues when you download or create the USB.
Here are some common issues and practical solutions.
The tool is not recognizing my USB drive.
If your USB flash drive isn’t in the Media Creation Tool, you should try the following:
- Disconnect the USB drive and reconnect it to another USB port. Ensure that the connection is tight.
- Open File Explorer, then click This PC, right-click on the USB drive, and choose Format. If necessary, format the drive using FAT32. Keep in mind that formatting will erase its existing data.
- Right-click the Start button to open Disk Management. Verify if the USB drive shows up in the list and assigned the drive letter.
- If the drive is listed as unallocated space, you might need to create a new volume and give it a drive letter. Take care to choose the right disk.
Once you have tried these steps, reopen the Media Creation Tool and see if the USB drive is detected.
If it persists, try another USB port or flash drive.
The tool is not opening.
The Media Creation Tool fails to launch or closes unexpectedly.
You should first right-click on the downloaded file and then click Run as administrator. This will ensure the application has the required permissions.
If it continues to fail to open, try the following solutions:
- Restart the computer and launch the utility once more.
- Temporarily see if your antivirus software or other security program is blocking the executable.
- Make sure there are no updates or issues currently occurring on your Windows.
- Delete the downloaded executable and download a fresh copy from Microsoft’s official website in case the original file is incomplete or corrupted.
The simple tests can solve many issues that keep the tool from starting.
Also read: Activate Windows Watermark? 7 Easy Ways to Remove It in Windows 10
Creating a Windows 11 Bootable USB Without the Media Creation Tool
If Microsoft’s Media Creation Tool doesn’t meet your requirements, you can also make a bootable Windows 11 USB flash drive another way.
On the Microsoft Windows 11 download page, click the download Windows 11 Disk Image (ISO). You can download the installation image directly, rather than automating the process through the Media Creation Tool.
After downloading the ISO file, you can use other tools to burn it to a USB Flash drive and make it bootable.
Here are two popular options: Rufus and Ventoy.
Using Rufus
Rufus is a free and unobtrusive tool that can be used to create a bootable USB drive from an ISO file.
It is compatible with Windows 8 and has been updated for recent versions of Windows, and it can be used as a portable application (no need to install it beforehand).
It’s one of the most convenient options; it downloads Windows ISO files directly from the Microsoft website. This means you don’t necessarily have to download the ISO separately before creating your installation drive.
Rufus also offers additional configuration abilities such as partition schemes, target system settings, and file systems.
Default settings work fine in most Windows 11 installations. Just select your USB drive, Windows 11 ISO, look at the configuration, and begin the process.
Rufus can be particularly useful if you want more control over your bootable USB drive.
Using Ventoy
Ventoy is another alternative that works differently when it comes to making bootable USBs.
Ventoy does not write directly to the USB drive like other programs, but prepares the drive with a boot menu that is able to recognize multiple ISO images.
Once Ventoy is installed on your USB flash drive, you can just copy and paste various ISO files to the drive. This can be Windows 11, Windows 10, or various Linux distributions.
After booting from the USB drive, Ventoy will show you a menu to select the OS image to boot.
This is particularly advantageous for IT professionals, technicians, and advanced users who frequently install or troubleshoot several operating systems.
But Rufus is a bit easier than learning Ventoy. If you are not well-versed with bootable USB tools, its initial setup and management can be more complicated.
Rufus is typically easier to use if you are just creating a Windows 11 installation drive. Ventoy, on the other hand, is more appropriate if you want to have multiple operating system installations on one USB stick.
Final Thoughts
Creating a bootable Windows 11 USB drive is not difficult. Most users will find it easiest to use the Windows 11 Media Creation Tool, which automates the download and USB preparation.
If you require more options, Rufus offers a flexible solution, and Ventoy may be considered if you are into multiple operating systems.
Whichever option you select, ensure to back up your USB drive before you begin and check the hardware specifications for the computer you are trying to install Windows 11 on. Following basic steps can help keep the installation quicker, safer, and more reliable.
FAQs: Windows 11 Media Creation Tool
How much USB storage do I need to create a bootable Windows 11 drive?
You need a USB flash drive with at least 8GB of storage. However, a larger drive can be useful if you plan to store additional installation files. Remember to back up your data because the creation process will erase the USB drive.
Is the Windows 11 Media Creation Tool free?
Yes. Microsoft's Windows 11 Media Creation Tool is completely free to download and use. However, you'll need a valid Windows license to activate the operating system if your device isn't already digitally licensed.
Can I create a Windows 11 bootable USB without a product key?
Yes. You don't need a product key to download Windows 11 or create installation media. You can also skip entering the key during installation and activate Windows later.
Is Rufus better than the Windows 11 Media Creation Tool?
It depends on your requirements. The Media Creation Tool is easier for beginners because it automatically downloads Windows and prepares the USB drive. Rufus offers more control over partition schemes, file systems, and installation settings.







Leave a comment