

If you are an avid gamer, you should know about the DXGI_ERROR_DEVICE_REMOVED error. It can appear from nowhere, causing your game to fail to load.
The DXGI error is a DirectX error mainly often caused by driver, system specifications, or graphics card problems. There are a variety of solutions to fix this issue. In this article, we teach you how to fix DXGI Error Device Removed on Windows 10/11.
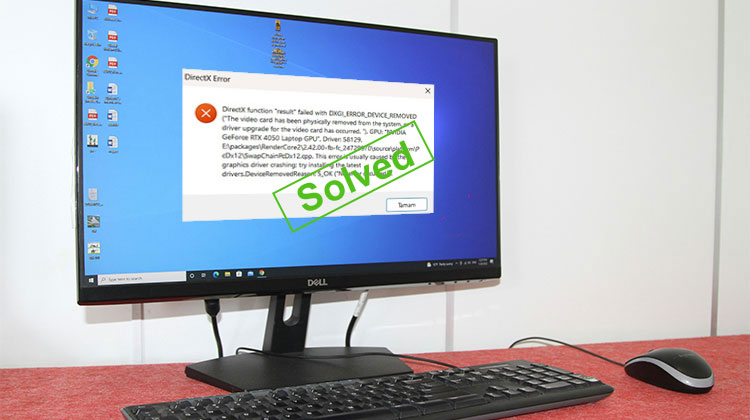
What Is DXGI Error Device Removed?
The DXGI Error Device Removed is a DirectX error related to your graphics card. It occurs when your graphics card stops communicating with your computer.
Common Causes
There are a variety of causes that could cause this problem.
- GPU driver crashes or corruption
- Overheating graphics card
- System or GPU overclocking instability
- Outdated or incompatible drivers
- Hardware limitations or faulty GPU
- Power supply issues under heavy load
To play games such as Arma, Battlefield, and GeForce experience, monitor your graphics card, drivers, and system specifications to avoid DirectX error in games.
Also read: Cyclic Redundancy Check Error: 8 Working Fixes You Should Try
How to Fix DXGI_ERROR_DEVICE_REMOVED?
If you are struggling to fix the DXGI Error Device Removed problem, don’t go away. We will show you the five best ways to fix this issue to ensure the best gaming experience. These are:
1. Turn Off NVIDIA ShadowPlay
In games such as GeForce Experience, Shadow Play is a feature that accelerates hardware, which is helpful for screen recording. You can remove this DirectX device removed error by deactivating this feature.
Steps to disable it:
- Click the “GeForce Experience” shortcut on your laptop, and select to run as an administrator
- Visit the “General” tab located on the left-hand panel. Disable “In-Game Overlay” and or “Share” options.
- Select “Apply” and save the changes to your computer.
- Reboot the computer and verify that the error has been eliminated.
2. Change the Registry
Direct3D driver’s fatal error gave an error code, which is a DXGI error. It is cleared by making the correct adjustments to your registry keys.
Steps:
- Press Windows+R on your home screen to open the Run Dialog Box.
- Write “Regedit” in the dialog box, then press “Enter.”
- Search for the “Register Editor”, and locate the following path in the left-hand panel
Computer\HKEY_LOCAL_MACHINE\SYSTEM\CurrentControlSet\Control\GraphicsDrivers
- After selecting the “GraphicsDrivers”, right-click the space and select “New > DWORD (32-bit) Value.”
- Give the name “TDR Level” to a DWORD with the value of zero.
- Save the changes and then restart your computer. This error should be fixed.
3. Disable Anti-Aliasing in NVIDIA Control Panel
The anti-aliasing feature in graphic software increases the quality of the output display. But it can also cause DXGI error device hung error. If you notice this happening, then you need to turn it off from the NVIDIA Control Panel.
- Right-click on your desktop and choose the Nvidia Control Panel from the options.
- Choose “Manage 3-D settings” from the panel control. Then, navigate to “Global Settings” to find “Anti-Aliasing Feature”.
- Turn all these settings to “Off”. Then click on “apply and save the changes”. Verify whether the error has been removed.
4. Reinstall or Update Graphics Drivers
Drivers are the primary cause of this error. To fix this issue, you need to uninstall the drivers and let Windows install its own. The system will automatically find drivers to ensure the smooth functioning of your program.
Steps:
- Search “Device Manager” on your home screen. It will show your computer’s name, along with the list of installed devices.
- Find the affected device and then select its “properties.”
- Click on the “Driver” and then select “Update Driver.”
- Choose “Search Automatically for updated Driver”.
- The windows will detect and install it. Restart your computer, and the DXGI won’t show again.
Also read: NVIDIA Control Panel Not Opening? Try These 8 Proven Solutions
5. Roll Back GPU Driver Updates
The DGXI could be due to driver updates, too. If the driver you have updated isn’t compatible with the gaming software you use, it is necessary to uninstall the update and then roll back to the previous version. This will resolve the problem.
Steps:
- Visit “Device Manager” on your computer and find the latest updated software.
- Press the Right-click to see its “Properties”.
- In the properties window, select “Driver” settings and select “Roll Back Driver.”
- Restart the system, DXGI error isn’t there.
Bottom Line
For any quality gaming experience, it is essential to maintain consistency. Unforced interruptions to the display can derail the enjoyment. The DXGI Error Device Removed issue could cause a crash to your gaming graphics, resulting in the loss of your progress or a total shutdown. The error can be caused by your graphics card, drivers, or overclocking your PC.
In this article, we’ve provided five methods to fix the DXGI Error Device Removed issue. Each of these solutions works on Windows 10 and 11. You can choose the method you prefer depending on your system needs and your personal preferences.
FAQs About DXGI Error Device Removed Error
Why does DXGI Error Device Removed happen?
This error usually happens due to GPU driver issues, overheating, unstable overclocking, power supply problems, or outdated DirectX components.
Which games are affected by DXGI Error Device Removed?
This error can appear in many games, including Battlefield, ARMA, Call of Duty, Fortnite, and other DirectX-based games.
Is DXGI Error Device Removed Error a hardware failure?
Not always. In most cases, it is caused by software or driver issues, but repeated crashes may indicate GPU or PSU hardware problems.
Does DirectX version affect this error?
Yes, outdated or corrupted DirectX files can lead to communication issues between the game and GPU.


Leave a comment