


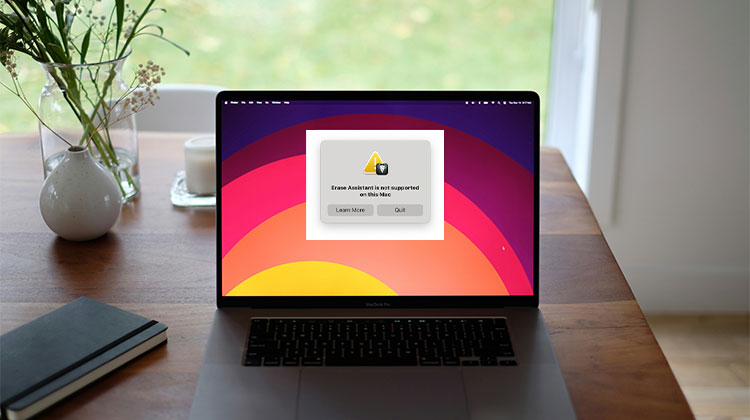
Mac users frequently report this error message: ” Erase Assistant is not supported on this Mac”. This Erase Assistant is crucial for setting your MacBook to factory defaults in preparation for trading or selling your Mac. Another reason to use Erase Assistant to wipe your Mac before reinstalling macOS. This built-in program on your Mac lets you:
- Remove all user accounts and personal data
- Delete apps, content, and system settings
- Disable Activation Lock and “Find My”
- Completely erase all volumes on your Mac
There’s no need to worry if you encounter the “Erase Assistant is not supported on this Mac” error. If you’re facing this error when trying to do a factory reset on the system, you’re in the right place! This article will aid you to understand these issues and possible solutions,” how to fix Erase Assistant is not supported on this Mac”. So, let’s get started!
Why Do I See “Erase Assistant Is Not Supported on This Mac”?
This built-in feature, known as the Erase Assistant tool, is accessible in Intel-based Macs and Apple Silicon Macs. It’s also essential to find out if you have macOS Monterey or a later version that includes the Apple T2 security chip. Then only you’ll have access to this erase Assistant feature. If your Mac does not meet the hardware or software requirements, then you can’t use the Erase Assistant tool.
If, for example, you encounter an “Erase Assistant is not supported on this Mac” error on macOS Monterey or Ventura, your system isn’t equipped with the necessary T2 or Apple Silicon chip. This is why errors happen on older macOS versions, which are not compatible with Apple Silicon chips.
Also read: MacBook Memory Cleaner Guide: 10 Best Tools to Free Up RAM
How to Check If Your Mac Supports Erase Assistant
To confirm that your MacBook has a T2 chip, M1, or M2 chip, follow these most important steps to take:
- Hit the Mac Spotlight shortcut, Command + Space, and then type “System Information”.
- Hit the System Information to start it.
- Opt for the iBridge or the Controller located on the left.
If you are unable to see “Apple M1 chip or M2 chip” or “Apple T2 Security Chip,” you cannot use the Erase Assistant on your Mac.
How to Fix ‘Erase Assistant Is Not Supported on This Mac’
This error, “Erase Assistant Is Not Supported on This Mac,” is a standard error. However, you can avoid this issue by erasing your Mac using recovery mode. As we said earlier, the Erase Assistant tool is available on Intel or Apple Silicon Macs equipped with a T2 chip, as these MacBooks run Monterey and higher.
Enter macOS Recovery Mode in Apple Silicon Macs
First, you’ve learned how to enter the Mac in Recovery Mode for Intel-based and Apple silicon Macs, you can then begin by erasing the Mac with Erase Assistant.
- Power off your Mac and boot it to macOS Recovery. You can do this by selecting the Apple logo in the menu bar, which is located at the upper left of your Mac. Selecting “Shut Down”.
- Give your Mac the time it needs to turn off completely. Once it’s shut down and the screen is all black.
- Press and hold the power button until it enters macOS Recovery on the Apple Silicon Macs.
Enter macOS Recovery Mode in Intel-Based Macs
- To access macOS Recovery on Intel-based Macs, you must press and hold Command + R on your keyboard.
- Continue to hold the keys until you see the loading options screen.
- Select “Options,” then click the “Continue” button in the start-up options window.
- Opt for a volume that you are asked to select on another screen. If yes, select the one you want to download and click “Next”.
- Choose the administrator account, then click “Next”.
- Next, you’ll be asked to type the password for your account.
- After entering your password, click the “Continue” button.
- Once completed, macOS Recovery will successfully launch on your Mac
Method 1. Factory Reset Using macOS Recovery
If you’re running an outdated macOS version or an incompatible device, you should not use this software to reset your MacBook Pro or Air. So, in these situations, the most efficient method to erase your Mac is to use macOS Recovery. The steps are listed below:
- Boot your Mac into Disk Utility and then click “Continue”.
- Select the internal hard drive from the sidebar, then erase it. Internal hard drives are typically known as Macintosh HD.
- After erasing all the data stored on Macintosh HD, you need to reinstall macOS to boot.
Method 2. Update macOS
Before trying anything else:
- Go to System Settings (or System Preferences)
- Click Software Update
- Install the latest macOS version available
If your Mac becomes compatible after the update, Erase Assistant may start working.
Method 3: Sign Out and Manually Remove Data
If you don’t want to erase the entire system:
- Sign out of iCloud
- Deauthorize Apple ID
- Delete personal files
- Remove user accounts
This is useful if you’re preparing to sell your Mac but can’t use Erase Assistant.
Why Can’t I Find Erase Assistant on My Mac?
Erasing all content and settings on a Mac is an essential option that allows users to remove their Mac devices and restore default settings. This is only a setting if you’ve got an M1 or T2 chip in your MacBook Monterey. But don’t worry! In this article, you will learn the steps needed to find Erase Assistant in macOS Monterey or Ventura. We will also show you how to use the tool to erase your MacBook.
In macOS Monterey:
- Open System Preferences
- Click Erase All Content and Settings
In macOS Ventura:
- Open System Settings
- Go to General → Transfer or Reset
- Click Erase All Content and Settings
If this option is missing, your device isn’t compatible.
Also read: Why Is My MacBook So Slow? 10 Tips to Speed Up MacBook
How to Use Erase Assistant to Reset Your Mac
If you’ve already learned how to find this option on macOS Monterey or Ventura, now is the time to begin formatting your MacBook.
- Click on the “Erase All Content and Settings” button.
- Type your administrative password to confirm your identity.
- Opt for a Time Machine backup. You can either choose to complete this process or skip it by clicking Continue.
- All data, settings, media, and apps are deleted from your MacBook. Click on the Continue to verify your selection.
- Verify that you have signed out of your Apple ID by typing the password.
- MacBook will be reset completely by pressing the button with the red letters.
- Wait a few times until the process is completed. Click the “Restart” button, adjust the settings, and then begin using the MacBook.
Ending Notes
What happens if, even though you are experienced with macOS basics, you come across an error message that says “Erase Assistant is not supported on this Mac”? If you’re using an Intel-based Mac that does not have a Secure Chip T2, there’s no solution to fix the issue.
FAQs: Erase Assistant Is Not Supported on This Mac
What does 'Erase Assistant Is Not Supported on This Mac' mean?
This error means your Mac does not meet the hardware or software requirements needed to use the Erase Assistant feature. Typically, it lacks an Apple Silicon chip (M1/M2) or the Apple T2 Security Chip, or it’s running an older macOS version.
Can I fix 'Erase Assistant Is Not Supported on This Mac'?
You can’t directly 'fix' this error if your Mac doesn’t support the feature. However, you can still factory reset your Mac using macOS Recovery Mode, which is the best alternative.
Why can’t I find “Erase All Content and Settings” on my Mac?
If the option is missing, your Mac likely doesn’t support it due to hardware limitations or an outdated macOS version.
Is it safe to reset a Mac using Recovery Mode?
Yes, resetting your Mac through Recovery Mode is safe and recommended by Apple. It completely erases your data and reinstalls macOS securely.
Can I use Erase Assistant on older Intel Macs?
No. Older Intel Macs without the T2 Security Chip do not support Erase Assistant, and there is no workaround to enable it.


Leave a comment