






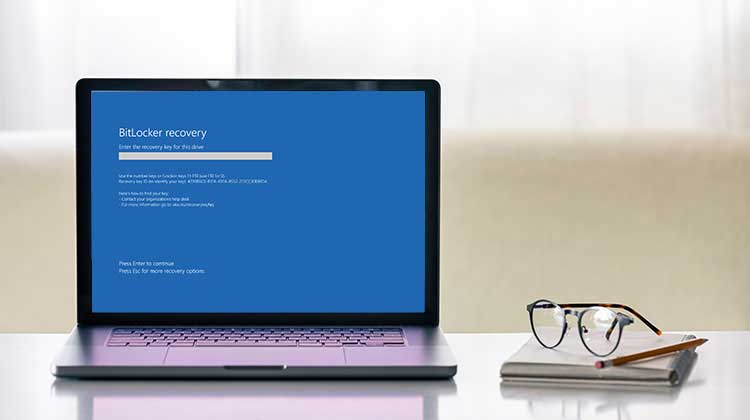
If you’re seeing the BitLocker Recovery Screen on laptop startup, it indicates that the installed HDD/SSD is encrypted and you must enter a 48 digit PIN to unlock it. This security feature is available on many modern devices. It occurs when you alter the computer’s components or change anything within the BIOS settings. If you’re not familiar with the BitLocker feature on Windows, this guide is for you. This guide will show you how to unlock this BitLocker recovery screen using the PIN, but without a PIN.
BitLocker Recovery Screen: An Overview
The BitLocker recovery screen is displayed whenever Windows detects changes in the BIOS settings or due to hardware replacement or changes to computer components. This stops normal startup and encrypts the HDD/SSD. This BitLocker Recovery Screen prompts you to enter a 48-digit PIN to unlock the device and gain access to your encrypted data. The screen also explains where to find it, such as a printout, USB device, or a Microsoft account.
It protects your data files from unauthorized access. BitLocker was added to Microsoft Windows in 2007 but was extensively improved in Windows 10. It’s activated with the user’s permission when setting up the device.
This BitLocker recovery screen can be triggered for various reasons. These are the possible causes that could trigger the lockout and show the blue screen:
- BIOS or UEFI configuration changes
- TPM configuration or hardware issues
- Firmware updates
- Major hardware changes
- Windows or system updates
- Boot configuration changes
- Secure Boot changes
- Unexpected changes to the trusted startup environment
BitLocker Drive Encryption offers the best protection for your hard drive. But if you experience the BitLocker recovery screen on your PC due to disk problems or other unknown reasons that prevent accessing your computer. There are ways to fix the problem in the following section of this tutorial.
How to Fix the BitLocker Recovery Screen?
1. Enter the BitLocker Recovery Key
The most straightforward way to avoid bypassing the BitLocker Recovery screen is to enter the BitLocker key. Most users save their BitLocker key to a USB drive. In addition, when you set up BitLocker security, you can store the recovery key in your Microsoft account. You can also verify the Microsoft account that is linked to your computer to obtain your recovery code.
If you are unable to find the recovery key to fix this issue, do not panic. There are a variety of methods to bypass it without a recovery key. The next step is to avoid it.
Also read: BitLocker Recovery Key: How to Find and Use It to Unlock Your Drive
2. Suspend BitLocker Protection
If you can successfully access Windows but the BitLocker Recovery Screen keeps appearing after every restart, temporarily suspending BitLocker protection may help identify or resolve the issue.
On supported Windows editions:
- Open Control Panel.
- Select System and Security.
- Open BitLocker Drive Encryption.
- Select Suspend protection.
- Restart your computer and check whether the recovery prompt continues to appear.
3. Use Command Prompt Carefully
If you are unable to open the BitLocker recovery screen with your recovery key, you can use Command Prompt. Open the Command Prompt from the BitLocker recovery screen, and then exit using the necessary commands. Here’s how:
- Use the Esc key to open the recovery options. Choose the Skip the drive option.
- Go to the Troubleshoot menu, choose Advanced options, then launch the Command Prompt
- Enter the following command into the Command Prompt to unlock your BitLocker drive.
manage-bde -unlock C: -rp
After that, you can type this command to remove the shield protecting the drive. Once you have done that, you can close Command Prompt and boot the system.
manage-bde -protectors -disable C:
4. Change Windows System’s BIOS Mode to Legacy
You can also eliminate this BitLocker recovery screen by switching your BIOS mode from UEFI to traditional Legacy. Follow the steps below and apply them to your system to disable that BitLocker recovery screen. Here’s how:
- Go to the Command Prompt, right-click, and then select Run as administrator.
- Enter the following command into the CMD and then execute it by pressing the Enter key.
- bcdedit /set {default} bootmenupolicy legacy
After the command is executed, restart your computer and check whether the BitLocker recovery screen is successful.
5. Reset Your BitLocker PIN
It’s simple to bypass the BitLocker recovery screen on an organization account. If you’ve got an enterprise account, you can reset your BitLocker PIN, and then remove it completely. Here’s how you can bypass this BitLocker login screen to change your password:
Use the Esc key when you see the keyword displayed on the BitLocker Recovery screen, and note the BitLocker Recovery key ID. The key ID will appear on the display for a brief duration, so make sure you’re paying attention and write it down quickly.
Contact your system administrator and provide him your BitLocker Recovery key ID. Your administrator will then change your BitLocker PIN using the provided BitLocker Recovery key ID.
6. Disable Windows Auto-Unlock
If none of these methods have worked to bypass the BitLocker recovery screen, think about disabling the Windows Auto-Unlock option. Windows provides Auto-Unlock options that are activated by default. you disable them.
We recommend disabling Windows Auto-Unlock to prevent the BitLocker recovery screen from appearing. Here are the steps you can follow to remove Windows Auto-Unlock with simple methods:
- Click on your Control Panel > System and Security. Select BitLocker Drive Encryption.
- Turn off the Auto-Unlock feature, and Windows will not display the BitLocker recovery screen when booting up.
Also read: How to Fix Kernel Security Check Failure Error in Windows 11 & 10
Tips to Prevent the BitLocker Recovery Screen
Although the BitLocker Recovery Screen is an important security feature, you can take several precautions to reduce the chances of seeing it unexpectedly.
- Save your BitLocker recovery key securely.
- Avoid unnecessary BIOS/UEFI changes.
- Keep Windows and firmware updated.
- Do not disable or clear the TPM unnecessarily.
- Back up important files regularly.
- Be careful when changing or replacing hardware.
- Keep a backup of your recovery key in a safe location.
- Contact IT before making major changes to a work or school PC.
Final Words
BitLocker offers an extra protection safeguard for the valuable files on your hard drive. It blocks access when there are any changes to the BIOS or the hard drive, for example, installing a new hard drive. Sometimes, however, it can be annoying if you don’t have access to the recovery key. This guide outlines the most effective methods to fix the BitLocker Recovery screen.
FAQs About BitLocker Recovery Screen
Why am I suddenly seeing the BitLocker Recovery Screen?
The BitLocker Recovery Screen usually appears when Windows detects a change in the device's security or boot environment, such as a BIOS/UEFI change, TPM issue, firmware update, hardware change, or boot configuration change.
Where can I find my BitLocker recovery key?
Check your Microsoft account, work or school account, saved files, USB drives, printed documents, or contact your organization's IT administrator if the device is managed by an organization.
Can I bypass the BitLocker Recovery Screen without a recovery key?
No legitimate universal method can bypass BitLocker encryption without the required recovery credentials. If your data is important, focus on recovering the correct recovery key.
Can I turn off BitLocker to stop the recovery screen?
If you can access Windows, you may be able to manage or suspend BitLocker protection. However, disabling BitLocker should not be used as a way to bypass recovery, and you should understand the security and data-protection implications first.










Leave a comment