






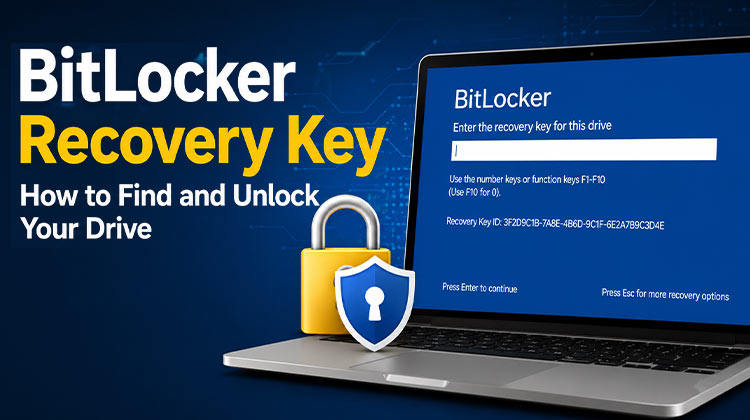
It is usually observed on Tuesday. A user reboots after a Windows update, or IT pushes a BIOS update overnight, and the next day, the laptop boots into a blue screen requesting a 48-digit BitLocker recovery key. There is no desktop; there is not even a login screen, but an empty field that reads the Key ID and an animated cursor.
Finding the key and how to use it will ensure you can safely unlock your drive at any time. This guide will help you find the key to your Microsoft account and use it to decrypt your drive and retrieve your data if access fails.
What Is a BitLocker Recovery Key?
According to Microsoft, the BitLocker Recovery Key is a unique 48-digit number created when BitLocker is first enabled on the device. It allows access to the encrypted drive when BitLocker cannot automatically verify authorization, such as after hardware modifications or failed PIN attempts, firmware updates, or a suspected security event.
Why Is Windows Asking for a BitLocker Recovery Key?
Windows may request the BitLocker Recovery Key for several reasons, including:
- Changes to your motherboard or hardware components.
- BIOS or UEFI firmware updates.
- Secure Boot settings modifications.
- TPM (Trusted Platform Module) issues or resets.
- Moving an encrypted drive to another computer.
- Multiple failed login attempts.
- Unexpected system crashes or Windows updates.
In most cases, the request is a security measure rather than a sign of data corruption.
Also read: How to Find Network Security Key on Windows 10
How to Find Your BitLocker Recovery Key?
You must go through these steps in sequence. Individual users are likely to discover their keys in Methods 1 or 2, 3. IT administrators managing corporate devices should first check Methods 4, 5, or 6.
1. Check Microsoft Account
If BitLocker was turned on while you were logged into the Microsoft account — which is the default for Windows 10 and 11 home devices – your recovery keys were automatically uploaded online.
Steps:
- Open a web browser on any device.
- Visit Microsoft’s BitLocker recovery portal.
- Sign in using the Microsoft account associated with the encrypted computer.
- Locate the device name and compare the displayed Key ID with the Key ID shown on the recovery screen.
- Copy the matching 48-digit recovery key.
- Enter the key on the locked computer to regain access.
NOTE: This only works if you had the Microsoft account when BitLocker first activated. Devices using a local account will not store keys in this location.
2. Look for a Printed Copy
Some users print their BitLocker Recovery Key during the setup process and store it with important documents. Check your files, folders, or any printed records you may have kept.
3. Check a USB Flash Drive
Windows provides an option to save the recovery key to a USB device. If you selected this option during BitLocker setup, connect the USB drive and look for a text file containing the key.
4. Check Azure AD / Microsoft Entra ID (Work or School Devices)
When your laptop is linked to Azure Active Directory (now Microsoft Entra ID), it is common for corporate laptops or school laptops — your recovery keys are kept within your company’s Azure AD tenant.
For End Users:
- Sign in to your work or school Microsoft account.
- Open your registered devices list.
- Select the affected device.
- Locate and view the stored BitLocker recovery keys.
- Match the Key ID shown on the recovery screen.
- Enter the correct key to unlock the drive.
For IT Administrators:
- Open the Microsoft Entra admin center.
- Navigate to Devices and select All Devices.
- Search for the affected device or user account.
- Open the device properties.
- Select BitLocker Keys.
- View and copy the recovery key.
Admins can also retrieve keys via Microsoft Graph PowerShell: Connect-MgGraph -Scopes BitLockerKey.Read.All then Get-MgInformationProtectionBitlockerRecoveryKey -All.
5. Check Active Directory (On-Premises Enterprise)
If your company has an on -premises Active Directory environment, IT administrators can pull key recovery from AD provided that the Group Policy was set to back them up when BitLocker is enabled.
Steps for IT Administrators:
- Open Active Directory Users and Computers.
- Enable Advanced Features from the View menu.
- Locate the affected computer account.
- Open Properties.
- Navigate to the BitLocker Recovery tab.
- Retrieve the stored recovery password.
Administrators can also search domain-wide recovery data using PowerShell commands. Get-ADObject -Filter {objectClass -eq ‘msFVE-RecoveryInformation’} -Properties msFVE-RecoveryPassword
NOTE: Keys are only saved in AD if the Group Policy required a backup before BitLocker became available on every device.
6. Check Microsoft Intune (MDM-Managed Devices)
Organisations that manage devices via Microsoft Intune can retrieve BitLocker recovery keys directly through the Intune administrator center.
Steps for IT Administrators:
- Open the Microsoft Intune admin center.
- Navigate to Devices and select All Devices.
- Locate the affected device.
- Open the device profile.
- Select Recovery Keys from the monitoring section.
- Copy the displayed recovery key.
Devices encrypted before Intune enrollment may not have recovery information stored within Intune.
7. Check Command Prompt and Manage-bde
If you can access an active Windows session, then you can recover the recovery key by using the built-in command-line tool manage-bde.
Steps:
- Open Command Prompt as Administrator.
- Then run: manage-bde -protectors -get C: (replace C: with the drive letter you encrypted).
- Find your numeric password section within the output.
- Copy the 48-digit recovery key found there.
- IT admins can query remote machines using the following command: manage-bde -cn ComputerName -protectors -get C:. This will require an active locked Windows session. It won’t work if you have already locked out of the device.
Also read: 7 Ways to Fix “Operating System Not Found” Error on PC Quickly
How to Use the BitLocker Recovery Key
When the recovery screen appears:
- Return to the BitLocker recovery screen.
- Verify that the Key ID matches the recovery key entry.
- Enter the full 48-digit key exactly as displayed.
- Press Enter to continue.
- Windows will verify the key and unlock the encrypted drive.
Once access is restored, you can continue using your computer normally.
How to Verify a BitLocker Recovery Key?
BitLocker recovery keys must be verified before you need them in an emergency. Invalid keys cannot unlock your device when it is needed.
Steps to verify in Windows 10 and 11:
- Open the verification tool: Type recovery key into the Windows search box, and then choose Verify the BitLocker Recovery Key.
- Enter your recovery key: Type the 48-digit key, then click Verify.
- Wait for verification: This may take several minutes, depending on the system you are using.
- Test the results: The tool will confirm if the key is acceptable for encryption on the drive.
What If You Cannot Find the BitLocker Recovery Key?
If you’ve tried every location but still cannot find the key, there are a few last-resort options to consider before accepting that the data might be lost forever.
- Try restarting your computer. Some BitLocker recovery prompts could be false positives that are caused by firmware updates or a minor startup issue. Rebooting provides Windows an opportunity to test the startup environment, and you might be able to log in normally.
- Reverse the most recent BIOS or hardware modifications. If you recently changed BIOS settings, changed the boot order, or hardware, reversing the modifications could allow BitLocker to restart without a recovery prompt.
- Contact your IT department. For organization-managed devices, IT might have backups not located in the places you’ve checked, particularly if keys were exported before the system was moved or stored in an external ITSM tool.
- Review for purchase or OEM documents. Some enterprise device purchases come with recovery key documentation. Verify the purchase documentation or call the device manufacturer.
- Reset your system. If no key is available, you may reset Windows with recovery media. It erases all data from the encrypted drive for good. The BitLocker-encrypted drive cannot be opened without a valid recovery code because the encryption was designed to block unauthorized access.
This is precisely why storing recovery keys at setup is crucial. Once they’re gone, the data disappears with them.
How to Prevent Future BitLocker Recovery Key Problems
To avoid future lockouts:
- Save the recovery key to your Microsoft account.
- Store a printed copy in a secure location.
- Keep a backup on an external USB drive.
- Create regular backups of important files.
- Avoid unnecessary BIOS or TPM changes unless required.
Conclusion
The BitLocker Recovery Key is one of the most crucial security measures to prevent permanent data loss on encrypted Windows devices. Whether your system is secured through a Microsoft account, Microsoft Entra ID, Active Directory, Intune, or a backup stored locally, knowing where to locate the key will save you many hours of troubleshooting and also prevent unnecessary data loss
FAQs: BitLocker Recovery Key
Is a BitLocker Recovery Key the same as my Windows password?
No. Your Windows password unlocks your account, while the BitLocker Recovery Key unlocks the encrypted drive.
Can I bypass the BitLocker Recovery Key screen?
No. BitLocker encryption is specifically designed to prevent unauthorized access without the correct recovery key.
Is It Safe to Share a BitLocker Recovery Key?
No. Anyone with your BitLocker Recovery Key can unlock your encrypted drive and access your files. Treat it like a password and only share it with trusted administrators or support personnel when necessary.
Can I disable BitLocker after unlocking my drive?
Yes. Once you regain access, you can disable BitLocker through the BitLocker management settings in Windows if you no longer wish to use drive encryption.








Leave a comment